FrameTrellis user guide
FrameTrellis is a local-first video editor: your media stays on your computer and is never uploaded. This guide covers everything the current version can do.
- Installing FrameTrellis
- The workspace
- Projects
- Importing media
- Editing on the timeline
- Transitions
- Adjusting clips
- Playback
- Exporting
- Missing media and recovery
- Troubleshooting
- Keyboard shortcuts
- Supported formats
The workspace
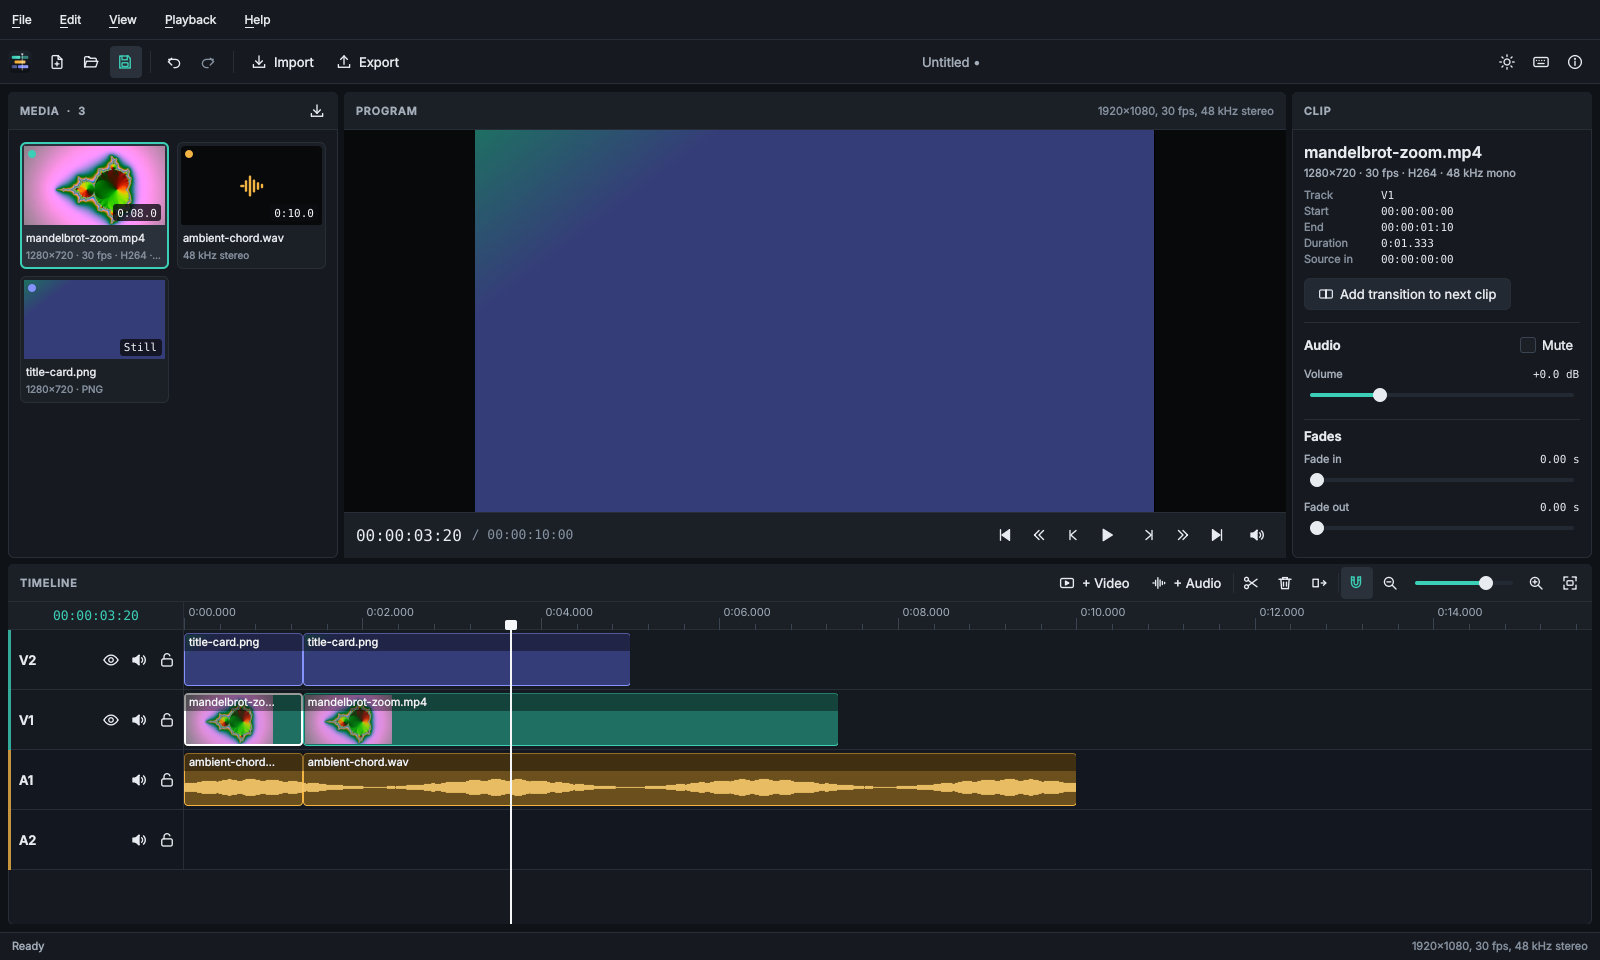
| Area | Purpose |
|---|---|
| Media (left) | Files in the project. Drag a tile to the timeline or double-click it to append it. |
| Program (centre) | The edited sequence at the playhead, with transport controls and timecode. |
| Clip / Project (right) | Properties of the selected clip, or a project summary. |
| Timeline (bottom) | Tracks and clips. Video tracks (V1, V2…) are drawn bottom-up: V2 covers V1. Audio tracks (A1, A2…) are mixed together. |
Panels can be resized by dragging the gaps between them. View switches between dark and light themes and between compact, normal and tall tracks.
Projects
- New project (Ctrl+N): choose a name and a format (resolution and frame rate). The frame rate can only be changed while the timeline is empty; the export resolution can be chosen later.
- Save (Ctrl+S) writes a
.ftprojfile. Saving is atomic: if it fails (for example, the disk is full), the previous file is kept. - Open (Ctrl+O) and File → Open Recent reopen projects. FrameTrellis asks before discarding unsaved changes.
Project files only reference your media; keep the media files when you move or share a project. If you move the project folder together with the media, FrameTrellis finds them again.
Importing media
Use File → Import Media… (Ctrl+I), the import button on the media panel, or drop files from your file manager onto the media panel or the timeline. Files are checked in the background: those FFmpeg cannot decode are reported and not added. Importing a file that is already in the project is ignored.
Supported: most video formats FFmpeg decodes (MP4, MOV, MKV, WebM, AVI, MTS, …), audio (WAV, MP3, AAC/M4A, FLAC, Ogg, Opus, …) and still images (PNG, JPEG, BMP, GIF, TIFF, WebP and others your Qt installation supports). Animated GIFs are treated as video. See Supported formats for the full list.
Right-click a tile to add it to the timeline, show it in its folder, relink it or remove it from the project (removing never deletes the file; media in use must be removed from the timeline first).
Editing on the timeline
- Add clips: drag a tile onto a track (a ghost shows where it lands and turns red where it cannot go), or double-click a tile to append it to the first suitable track. Video and image files go on video tracks; audio files go on audio tracks. Video files with sound can also be placed on audio tracks to use only their sound.
- Select: click a clip; Ctrl+click adds to the selection. Click an empty part of a track to clear the selection and move the playhead.
- Move: drag a clip left/right or onto another track of the same kind. Moves that would overlap another clip are refused — nothing is ever overwritten.
- Trim: drag the left or right edge of a clip. You cannot trim beyond the start or end of the source media.
- Split: move the playhead and press S. With clips selected, only those are split; otherwise every unlocked clip under the playhead is split.
- Delete: Delete removes the selected clips and leaves a gap; Shift+Delete (ripple delete) removes one clip and moves the following clips on that track left to close the gap.
- Snapping (N) aligns clip edges with other clips and the playhead.
- Zoom with + and −, Ctrl+mouse wheel, the zoom slider, or Fit to see the whole sequence.
- Tracks: add tracks with + Video / + Audio; each track can be hidden (video), muted or locked. Double-click a track name to rename it; right-click it to remove the track.
Every change can be undone (Ctrl+Z) and redone (Ctrl+Shift+Z).
Clips on audio tracks show the waveform of their sound, scaled by the clip's volume. The first time a file is used, FrameTrellis reads its sound in the background (a few seconds for a long file) and keeps the result in its cache, so the waveform appears instantly afterwards.
Transitions
A transition blends one clip into the next where they meet: a dissolve on video tracks and a crossfade of the sound on every track.
- Make sure the two clips touch: the second clip must start exactly where the first one ends (with snapping on, drag it until it snaps to the end of the first).
- Select the first clip and press T (Edit → Add Transition), or choose Add transition to next clip in the inspector. The transition is one second long, or shorter if the media does not allow that.
- Click the transition (the box with the bow tie over the cut) to select it. The inspector shows its length, which you can change with the slider, and a button to remove it. Delete also removes it.
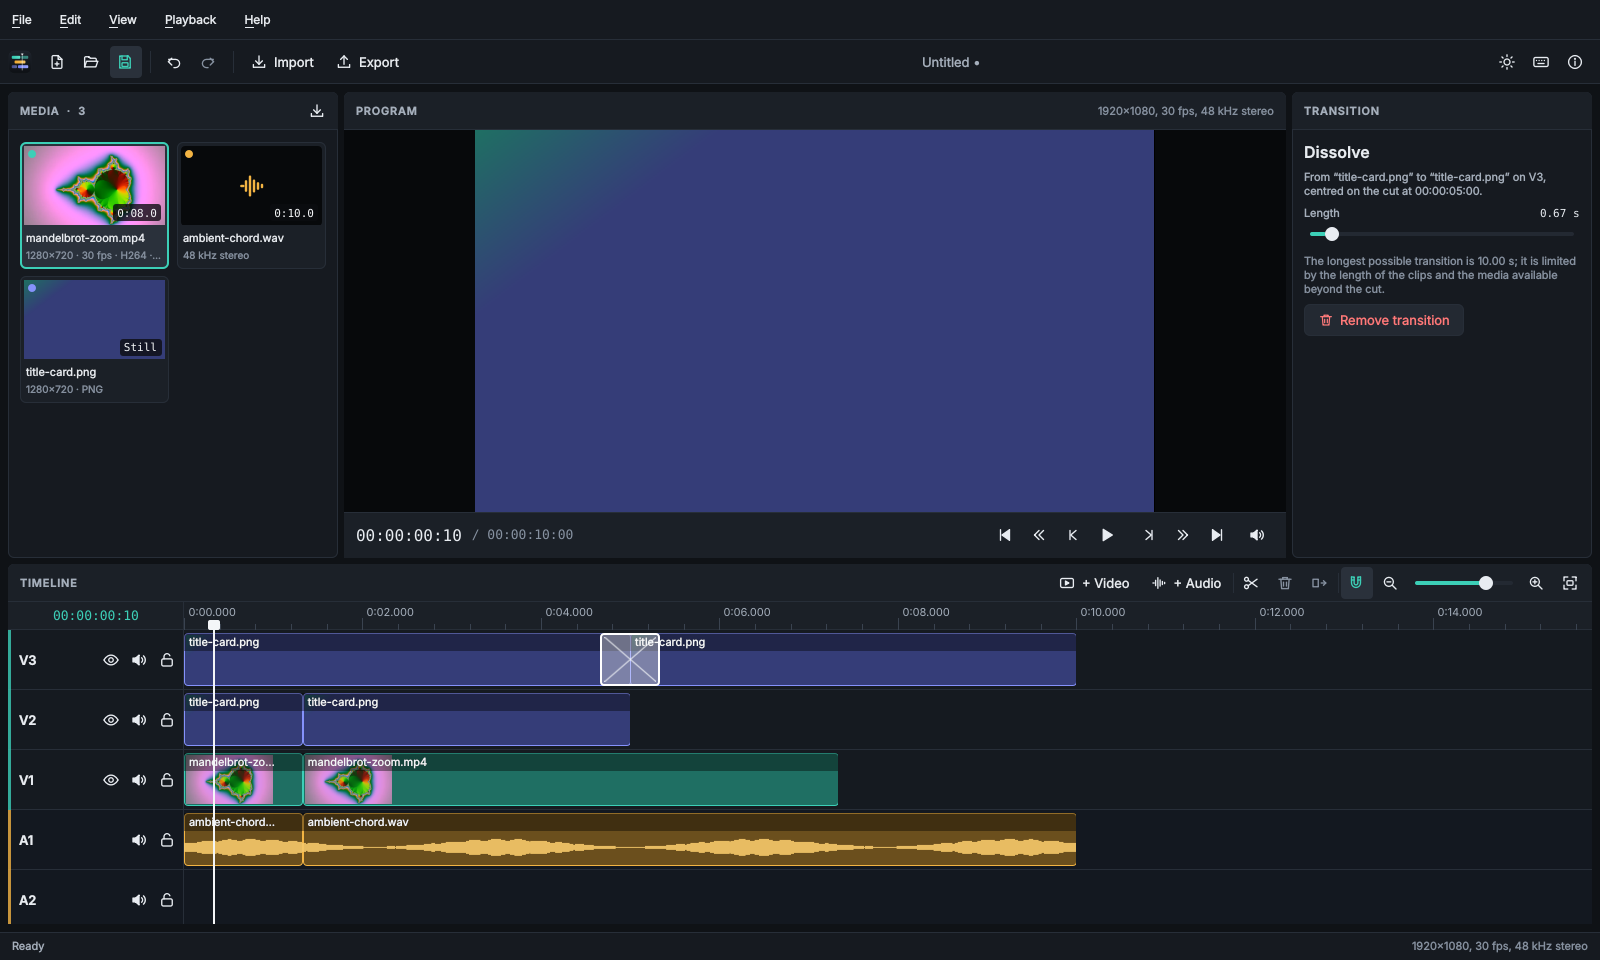
A transition is centred on the cut, so both clips need unused media around it: the first clip must continue after its end and the second must start earlier in its file. If a clip already uses its whole file, trim it a little first. Still images can always be blended. Moving a clip away from the cut or trimming it at the cut removes the transition; undo brings it back.
Adjusting clips
Select one clip to see its properties:
- Audio: volume (−∞ to +12 dB) and mute.
- Fades: fade-in and fade-out length. Video fades reveal the track below (black on V1).
- Picture: opacity, brightness, contrast and saturation. Double-click a slider to reset it.
Brightness, contrast and saturation need FFmpeg's
eqfilter; if your installation lacks it, the inspector says so.
Continuous slider changes become a single undo step.
Playback
Space plays and pauses; Left/Right step one frame; Shift+Left/Right move one second; Up/Down jump to the previous/next edit point; Home/End go to the start/end. Clicking or dragging on the ruler moves the playhead. If no audio device is available, the preview plays silently.
Exporting
File → Export… (Ctrl+E):
- Choose a preset (Match project, 1080p, 720p, 2160p, Fast draft).
- Choose where to save the
.mp4file. - Optionally adjust quality (lower CRF = better quality, bigger file), encoder speed and audio.
- Click Export.
The export runs in the background — you can keep editing; it uses a snapshot of the project. The status bar shows progress. The result is written to a temporary file first and only replaces an existing file once the export succeeded. FrameTrellis refuses to overwrite your source media or the project file. Exports need all media to be available (relink offline files first).
Output: MP4 with H.264 video (yuv420p) and AAC audio, which plays almost everywhere.
Missing media and recovery
If a media file was moved or deleted, its tile shows Offline and its clips show a red placeholder. Right-click the tile and choose Relink missing file… to locate it. The replacement must be the same kind of media and at least as long as the clips need.
FrameTrellis saves a backup of unsaved work every minute. If it closes unexpectedly, it offers to recover that work the next time it starts.
Troubleshooting
- "The media engine could not start" — the MLT modules were not found; reinstall FrameTrellis. Developers: see building.
- No sound — check Playback → Mute Preview and your system's audio device. The speaker icon under the monitor is crossed out when no audio device is available.
- A file is not supported — the import message names the reason. Converting the file with FFmpeg (for example to H.264 MP4) usually helps.
- Logs — Help → About → Open log folder. Copy diagnostics copies version information for bug reports.
This page is generated from docs/user-guide/README.md in the repository. Found a mistake? Open an issue.